I want to share my experience with Tracer, the first Mac screenshot tool I ever used, which I happened to find by sheer luck. I had grown frustrated with macOS’s built-in capture tool in many ways, but since switching to Tracer, my entire screenshot workflow has changed for the better.
Update history
v1.7.0 (October 17, 2026, latest): Previous area in OCR and Translate, and a faster way to finish scroll captures
v1.6.0 (October 13, 2026): Auto focus, faster OCR and a redesigned text panel
v1.5.0 (October 6, 2026): Free to download, with a one-time Pro upgrade
Why the Developer Built Tracer
I tried many apps myself, but one or two small issues always left me frustrated. So I moved from one app to another, and then another, eventually cycling through a long line of screenshot apps.
What I wanted was not some special feature, but an app that could handle everyday tasks quickly, without getting in my way.
I have worked as a web developer for over ten years, most of that time alongside product managers and designers. I tried to streamline in Tracer the tasks I repeatedly performed during web development.
If you need a very specific, advanced feature, another app might suit you better. But if you simply want your everyday screen work to go more smoothly, I think you will like Tracer.
— Tracer’s Developer
Where macOS’s Built-in Capture Tool Fell Short
I ran into a lot of frustration using the capture tool built into macOS. The preview thumbnail that appears in the bottom-right corner right after a capture disappears automatically after about five seconds, and there is no official option to extend that time or keep it pinned on screen. Having to click and drag it to save or attach it somewhere within that short window made the whole process feel tedious every single time.
Even if you could keep the preview on screen indefinitely, that might feel inconvenient in its own way, depending on the situation.
The 11 Action Bar Features You Can Pick Right After Capturing
Tracer is built so that, right after a capture, you can instantly choose whichever of Save, Copy, Drag to Export, OCR, Markup, Focus, Tracing, Blink Test, Upload, Setting, and Close you need, and every one of them can also be triggered with a keyboard shortcut. Compared with the built-in Mac capture tool, it packs in a genuinely convenient set of features.
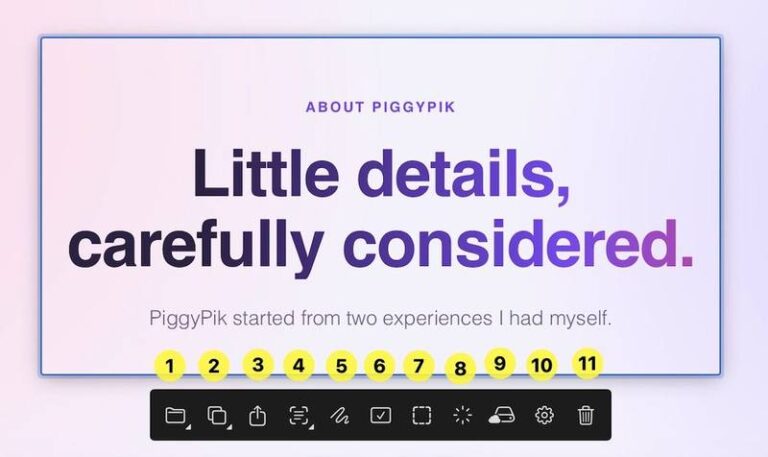
- Save: Saves the captured file. (Cmd⌘ + S)
- Copy: Copies the screenshot. (Cmd⌘ + C)
- Drag to Export: Click this menu with the cursor and drag it, and you can attach or move the file directly to wherever you want.
- OCR: An optical character recognition feature that turns the text inside an image into draggable, selectable text. (Explained in detail below.)
- Markup: Lets you add edits directly on top of the captured image. (Explained in detail below.)
- Focus: If you have several screenshots open on screen and turn on Focus, only the one you selected stays visible while the rest are briefly hidden. Since 1.6.0, Auto focus (Pro) does this as soon as you select a shot, and Tab moves between the hidden ones (details below).
- Tracing: Overlays two layers (an original design and the actual screen) semi-transparently so you can compare them.
- Blink Test: Rapidly flips between two images, like a blink, to help you spot the differences.
- Upload: Uploads directly to Google Drive. (Pro)
- Setting: Opens the settings screen.
- Close: Closes the capture screen.
OCR: Turning Text in Images into Real Text
OCR (optical character recognition), put simply, is a feature that turns the text inside an image into text you can select and drag.
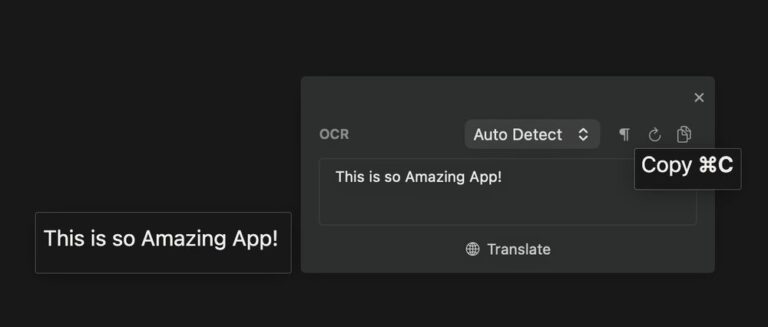
Some of the situations where OCR comes in most handy are as follows.
- Pulling text out of images that block copying: You can instantly extract text from card-news graphics, infographics, or web pages that disable text selection.
- Organizing receipts and document details: You can quickly and accurately copy long, complicated serial numbers or account numbers from payment records, scanned documents, or PDFs without a single typo.
- Extracting subtitles from videos: While watching a YouTube video or an online lecture, you can capture whatever text or subtitles appear on screen and turn them directly into text.
OCR got faster in 1.6.0. You can see it in action, along with translating right in the text panel, in the 1.6.0 update video.
Markup: Finishing Your Edits Right on the Capture
Markup is an editing feature that lets you draw, or add text, arrows, and highlights, directly on top of a captured image. Its defining strength is that you can finish arrows, text, and even mosaic blurring all in one pass, right after capturing, with no need to open a separate image editor.
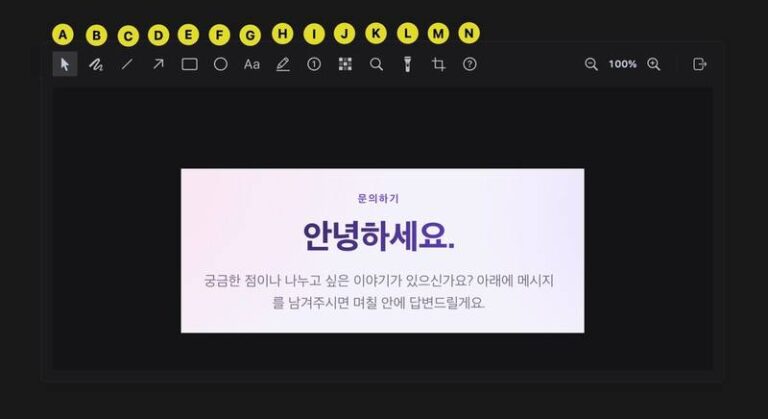
- A. Select (selection tool, shortcut V): Used to select an arrow, text box, shape, or other element you already drew, so you can adjust its position or size.
- B. Pencil (freehand drawing, shortcut P): Lets you freely handwrite or draw with your mouse or trackpad, just like drawing with a pencil.
- C. Line (straight line, shortcut L): Useful for drawing a clean, perfectly straight line to mark off an area.
- D. Arrow (shortcut A): Used to intuitively point at a specific button or the point you want to emphasize.
- E. Rectangle (shortcut R): Draws a clean rectangular outline around an important sentence or button to emphasize it.
- F. Ellipse (circle/oval, shortcut O): Draws a clean circular outline when emphasizing an icon or another rounded element.
- G. Text (shortcut T): Lets you type additional explanations or a title directly onto the image.
- H. Highlighter (shortcut H): Draws attention to important text by tinting it semi-transparently, just like coloring over it with a real highlighter.
- I. Number (shortcut N): Stamps down numbered icons like ①, ②, ③ with a single click, useful for guiding readers through a sequence of steps or instructions.
- J. Redact (mosaic/blur, shortcut B): Neatly conceals sensitive areas, like account numbers or email addresses, that should not be exposed publicly.
- K. Magnifier (shortcut M): Zooms into a specific part of the image like a magnifying glass, so small text or fine detail becomes easy to see.
- L. Spotlight (shortcut S): Darkens everything around the area you want to emphasize, drawing the viewer’s eye to a single spot.
- M. Crop (shortcut X): Trims away unnecessary margins from the captured image, leaving only the area you want.
- N. Shortcuts: A help panel that lets you see every keyboard shortcut available in Markup at a glance.
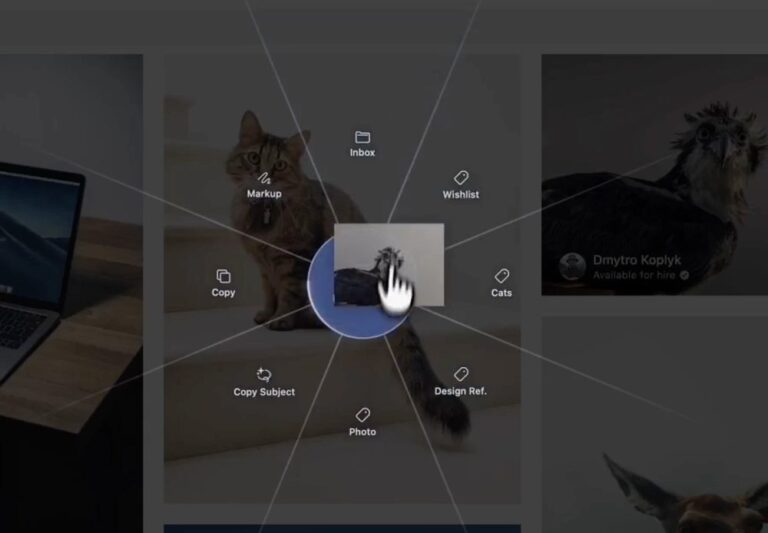
Drop Zone: A Quick Menu That Opens Just by Dragging an Image
If you press the capture shortcut while clicking and dragging an image file, a Drop Zone appears, giving you instant access to a range of features. I was also genuinely impressed by how much attention went into the Drop Zone’s animation and sound, right down to the smallest details.
There are various other features beyond these, but this covers everything in Tracer that I have actually tried myself.
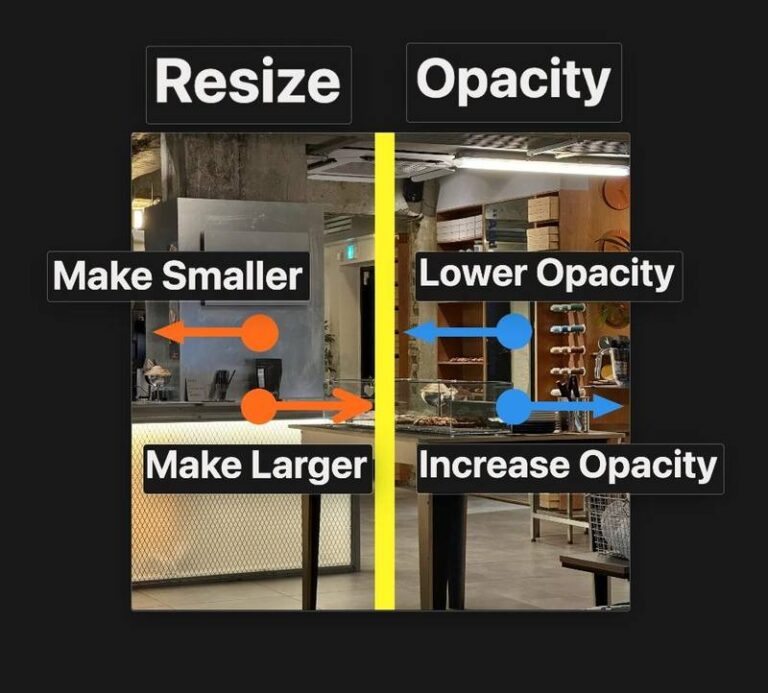
If you hold down the right mouse button and drag, dragging rightward from the left half of the capture (relative to its center) adjusts its size, while dragging rightward from the right half adjusts its opacity. After just a few tries, you will find it much more convenient to fine-tune this way.
The Upsides: A Reasonable Price and Careful Attention to Detail
- Tracer is free to install, and Pro is a one-time $10 purchase with no subscription. New users get a 14-day trial of every Pro feature, and basic capture and editing stay free after that. Considering that most apps with similar features cost more and ask for a subscription, the price here is quite satisfying.
- I would say the features of Tracer I have introduced so far are, in themselves, its biggest strength.
- The motion animations and sound effects, polished right down to the smallest detail, are also a satisfying part of the experience.
How Far Can Markup Alone Take You? An Example I Made Myself
This is the process of me making a graphic using nothing but the Markup feature. It started from a simple question: “Instead of a dedicated graphics tool, how far can I get using only Tracer’s Markup feature?” So I combined and tested Tracer’s various tools myself. Here is a summary of what I learned along the way.
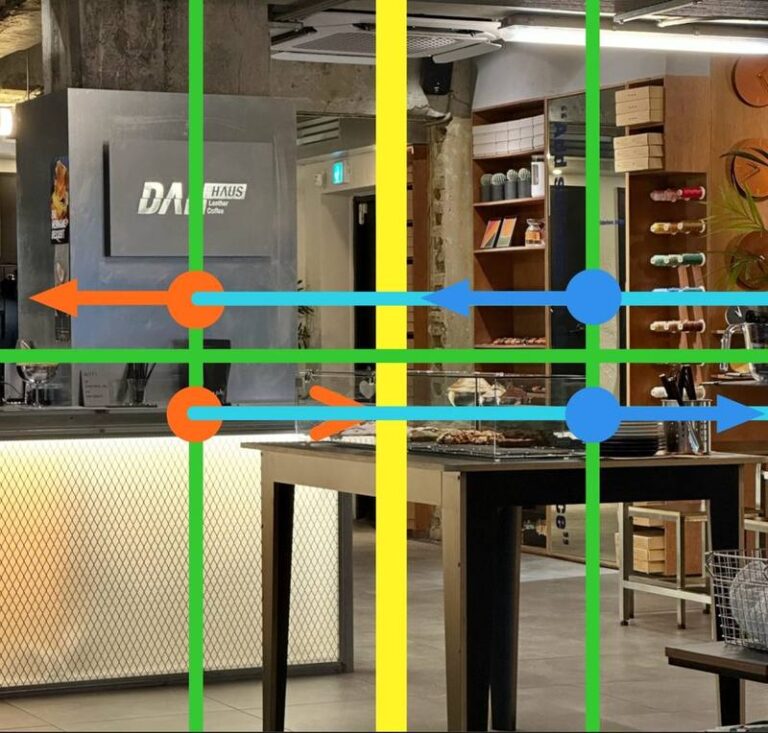
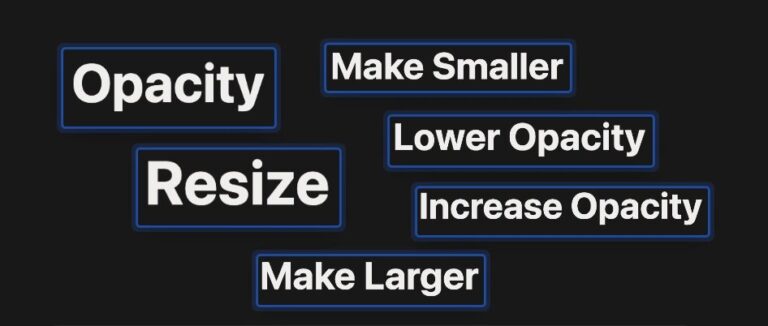
While working through this simple task, I found myself thinking that it would be far more efficient if Tracer added features like merging objects, multi-selecting, and duplicating shapes, the way Photoshop or Illustrator does. If it also offered a range of ready-made basic shape samples on top of that, its usefulness would go up even further.
I was also left wishing for a Snap feature and Smart Guides that magnetically align a shape or object to other elements’ anchor points, center lines, and spacing when you move or resize it, which would make things even more convenient. Neither exists in Tracer yet, but if it developed in that direction, I think it could become an even more polished tool.
- Snap: A behavior where an object locks into place magnetically as it nears a grid, a guide line, or another object’s edge.
- Smart Guides: A feature, found in apps like Photoshop, Illustrator, and Figma, that displays real-time guide lines while you move an object, helping you align it symmetrically, center it, or match spacing with other objects.
Despite these minor wishes, Tracer is a tool that fits its purpose of fast capture and intuitive expression perfectly. It launches quickly and stays lightweight, while still handling basic Markup work more than adequately.
Hold down the Shift key and click objects one after another, and their outlines turn blue to show they are active, letting you select and move several objects at once.
Update History
Tracer keeps getting updates, so I have listed what changed in each version, newest first. Click a version to open or close it.
✦ v1.7.0October 17, 2026LatestPrevious area in OCR and Translate, and Cmd⌘ + C or S to finish a scroll capture
Tracer 1.7.0 came out on October 17, 2026. It is a smaller update than 1.6.0, but it makes two familiar actions work the same way in more places.
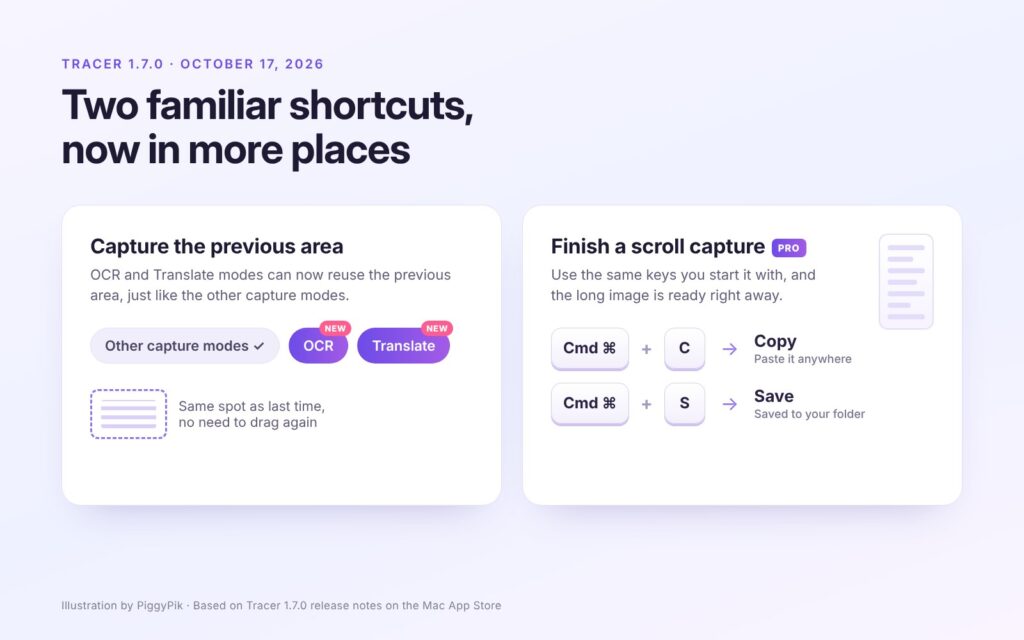
Capture the Previous Area in OCR and Translate
OCR and Translate modes can now capture the previous area, just like the other capture modes. If you keep reading text from the same spot on screen, you no longer have to drag out the area every time.
Finish a Scroll Capture With Cmd⌘ + C or Cmd⌘ + S
You could already press Cmd⌘ + C or Cmd⌘ + S while selecting an area to start a scroll capture that is copied or saved without a floating shot. Now the same keys also finish a scroll capture, so the long image is copied or saved right away. Scroll capture is a Pro feature.
Other Changes in 1.7.0
- Memory efficiency has been improved.
- On macOS 26 or later, the captured area no longer wobbles briefly at the moment of capture.
- Other usability and stability improvements.
✦ v1.6.0October 13, 2026Auto focus, faster OCR and a redesigned text panel
The biggest change in Tracer 1.6.0, released on October 13, 2026, is Auto focus. When you keep several captures floating on screen, things get cluttered fast, and this feature takes care of that.
Auto Focus: Keep the Shot You Picked, Hide the Rest
- Auto focus: Select a shot and only that one stays on screen while the others hide automatically. You no longer have to focus each shot yourself.
- Turning it on: It’s a Pro option. Turn it on under Settings › Shot › Auto focus, or press Cmd⌘ + Shift⇧ + F on a shot to switch it on and off.
- Moving with Tab: While a shot is focused, press Tab to move focus to the next hidden shot.
When I took four captures in a row, the earlier shots tucked themselves away each time a new one appeared, leaving only the shot I had just taken. Closing the focused shot brought the next hidden one forward right away, which made it much easier to check and clear several shots one at a time.
Faster OCR, With Translation Right in the Text Panel
OCR has been reworked in 1.6.0, so text comes out faster than before.
When I captured an English guide, the recognized text showed up the moment I selected the area, and one click on Translate finished the job. The wait felt noticeably shorter than before.
A Redesigned Text Panel
The text panel has been redesigned. You can drag it from anywhere except the buttons, and set the font size, panel size, auto close and auto copy to suit your preferences.
Click the settings button at the top right of the panel to change these right away:
- Auto copy when opened
- Auto close when focus is lost
- Panel size: Default width, Default height and Max height
- Text: Text size and Line spacing
✦ Handy Tip
Copy or Save Several Images at Once
If you have several captures floating on screen, you don’t have to copy or save them one by one.
- Shift ⇧+ClickAdd each image you want to the selection.
- Shift ⇧+Cmd ⌘+CEvery selected image window closes, and they’re all copied together.
- Shift ⇧+Cmd ⌘+SSave them all the same way.
- Cmd ⌘+ASelects every shot, including the one you have selected now (the master).
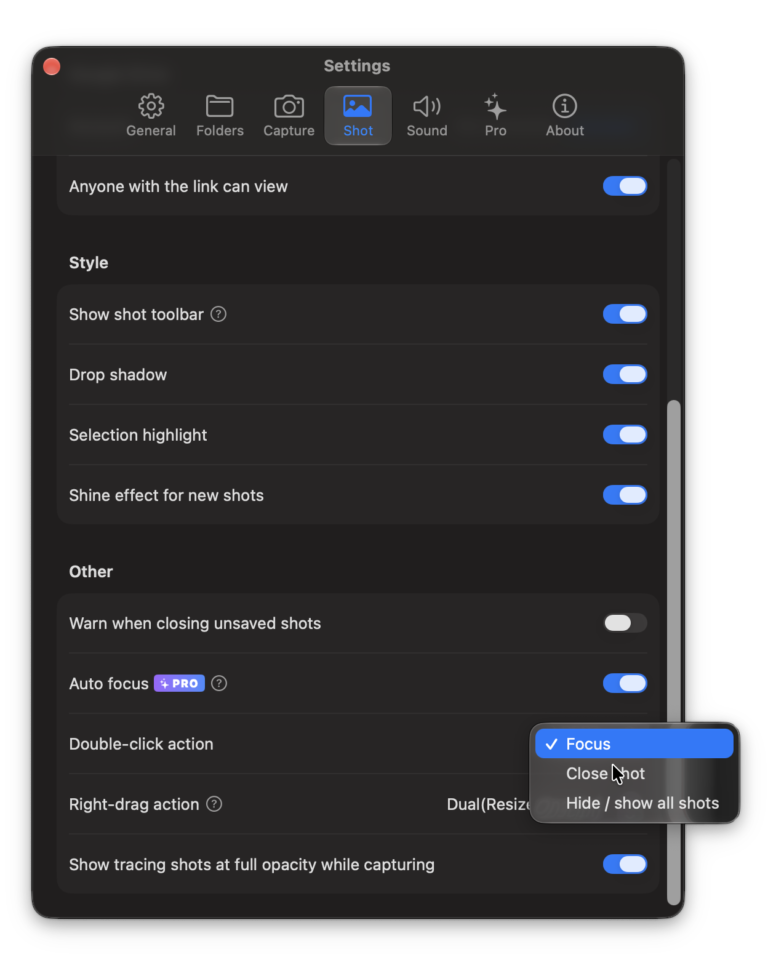
When Auto focus is on, selecting a shot makes the other images disappear. To keep them all on screen, set Double-click action to Focus under Settings › Shot, then double-click an image instead. The rest stay where they are. From there, press Cmd⌘ + A to select every image, and Shift⇧ + Cmd⌘ + C copies them all and closes them in one go. Saving works the same way with Shift⇧ + Cmd⌘ + S.
Other Changes in 1.6.0
- Each custom shortcut can now have its own post-capture action. Instead of the old “Copy without floating” option, pick any combination of floating shot, copy and save.
- A new “Always copy after capture” option copies every capture to the clipboard as soon as it’s done.
- Scroll and video captures can now be copied or saved without a floating shot. Use a custom shortcut, or press Cmd⌘ + C or Cmd⌘ + S while selecting the area.
- Taking a new shot while all shots are hidden no longer brings the hidden ones back. The number of hidden shots now appears in the toolbar.
- Occasional freezes and lag during OCR on macOS 27 Golden Gate have been fixed, along with other usability and stability improvements.
✦ v1.5.0October 6, 2026Now free, with a one-time Pro upgrade
Tracer 1.5.0, released on October 6, 2026, changes how you get the app. Tracer is now free to install, and every new user can try all Pro features free for 14 days. After the trial ends, basic capture and editing stay free.
What Needs Pro
- Pro features: scroll capture (capturing a long page in one shot as you scroll), video and GIF trimming, and Google Drive upload.
- Price: $10 as a one-time purchase, with no subscription.
- Already bought Tracer? You keep Pro at no extra cost.
This means the Upload button in the action bar (number 9 above) is now part of Pro.
Other Changes in 1.5.0
- Nine new languages: Brazilian Portuguese, Dutch, Swedish, Danish, Norwegian, Polish, Turkish, Russian and Vietnamese.
- While recording a video, press X after selecting an area to switch between MP4 and GIF.
- A new double-click action for shots hides or shows all of them at once. You can set it under Settings > Shot.
- A Google Drive upload that sometimes showed up as failed has been fixed, along with other usability and stability improvements.
Wrapping Up
Today I have shared an introduction to Tracer, along with my own impressions after using it steadily over time. I genuinely liked how clean and intuitive its features and behavior are, and since it already includes only the features it truly needs, I believe that if it keeps improving based on feedback from more users, it could win over far more people than it already has.
Through the 1.5.0 and 1.6.0 updates, the light, quick feel I loved from the start has stayed the same, and handling several shots has actually become easier. I will keep adding new versions to this post as they come out.
The developer’s attitude and approach also left a strong impression on me, and I think it is a mindset worth learning from as a developer myself.
The reason I have not dwelt on downsides in this post is simple: the benefits I gained from using the app far outweighed them, and I could sense the developer’s thought and effort behind it. Of course, if I looked for things to nitpick, I could find them, but rather than cold criticism, I would rather offer the warmer kind of communication that is ‘feedback.’ I sincerely hope the developer keeps growing through honest communication with users.
A Word to the Developer
I want to close by offering my sincere thanks to the developer, who noticed a real frustration and turned it into an app that fixes it. I have been enjoying it thanks to your work, and I am rooting for everything still to come.
Seeing small annoyances I actually ran into, like juggling several shots, get smoothed out so quickly with Auto focus has made me look forward to every new update.
Thank you for reading today, and I hope you have a wonderful day.
How to Download and Install Tracer
Here’s what Tracer costs and how to set it up.
Mac App Store
Free to download, with a one-time Pro upgrade
-
1Get Tracer
Click the button below to open Tracer’s page on the Mac App Store, then click Get.
-
2Open Tracer
Once it’s installed, open Tracer from your Applications folder.
-
3Allow screen recording
Tracer needs permission to capture your screen. If macOS asks, open this location and turn on Tracer.
System Settings›Privacy & Security›Screen & System Audio Recording
Why the permission? macOS only lets the apps you allow capture what’s on your screen, so a screenshot tool can’t work without it.